Note: This post belongs to the blog-series ‘Understand SAP EWM’. The purpose of these series of blog-posts/videos is to explain the concepts of the core features of SAP EWM in a simple way. I want to focus on the basic understanding rather than the smallest details. For those of you who are a bit more experienced I will soon publish a blog/video about how to enhance the standard pick point logic.
As a starting point we will take the definition given by SAP:
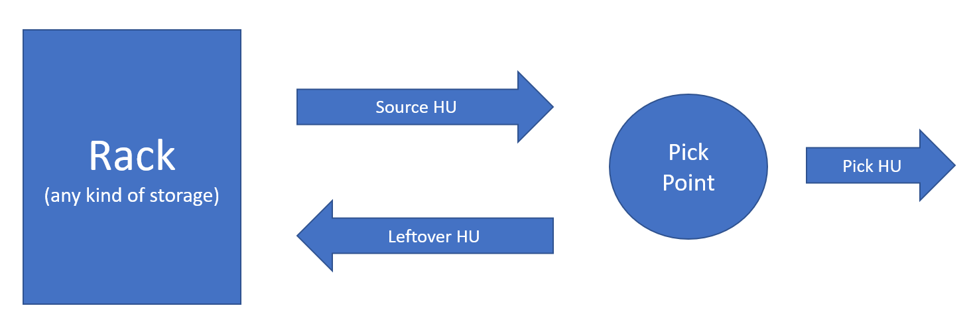
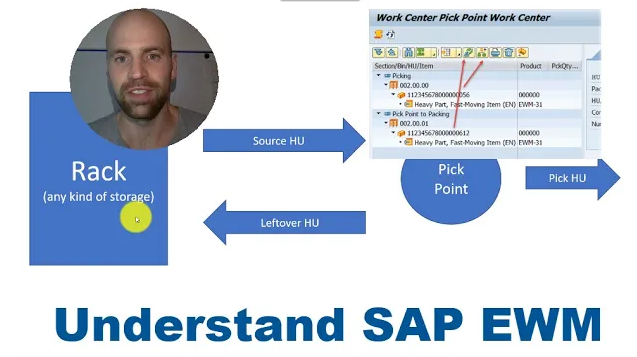
The pick point is the actual place in the warehouse at which you pick items for a partial stock pick from a handling unit (HU).
From process perspective that means that we are moving (either manually e.g. via forklift or automatically via an ASRS & conveyor system) the source HU to a specific place in the warehouse where the picking process is executed. Once done, we are moving the source HU back to where it came from and the pick-HU can proceed with the next step in the given storage process:
If you want to compare it to a real-world example just imagine having invited your friends for dinner at your home. You’ve cooked lots of different dishes and once you want to start having dinner you will move the pots and pans with the dishes from the kitchen to the dining room. All your guests can grab from the pots/pans and drop the food they’d like to eat on their plates, banana leaves etc. Once the dinner is over, you take the leftovers (partially filled pots & pans) and move them back to the kitchen.
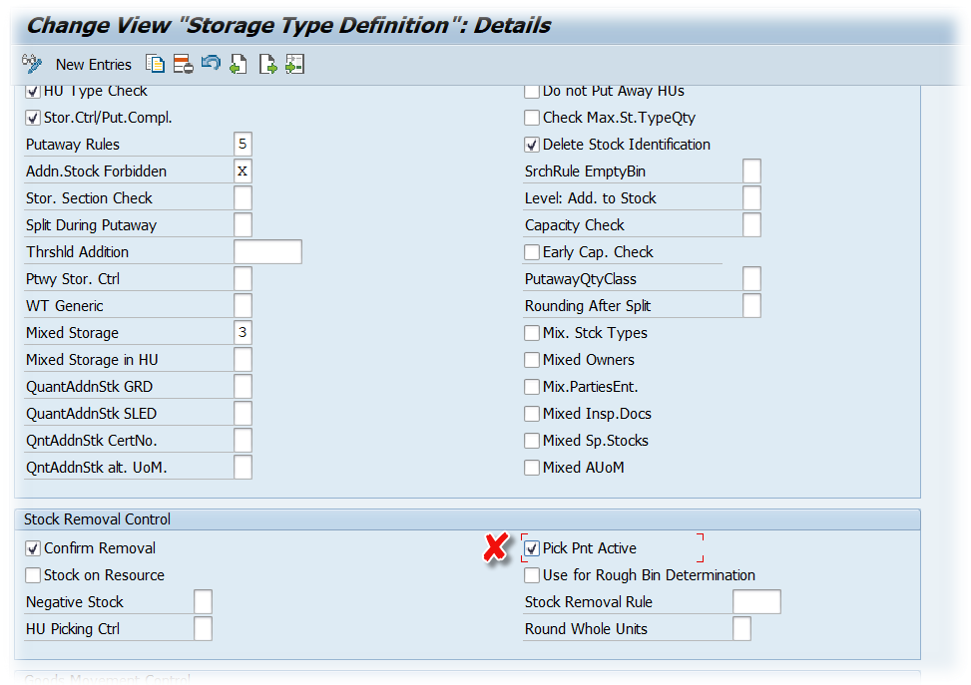
Having said that, let us have a look at the customizing that is needed in order to make this work. We’ll start with the storage type settings. For the simple process described above you need at least two storage types. The one where the stock is stored (e.g. a high bay warehouse /ASRS). For this source storage type you need to activate the ‘Pick Pnt Active’ parameter. If you do not set this parameter, EWM will also ignore the LOSC entry which controls the routing (details below):
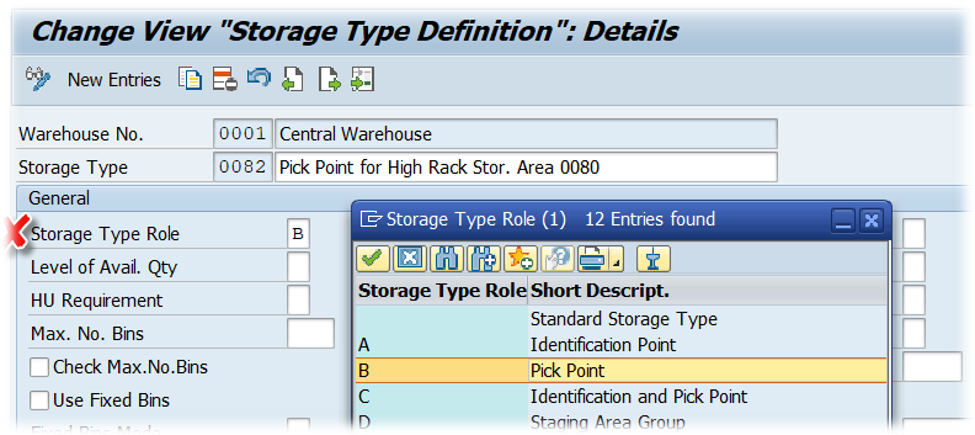
The second storage type is the one which is carrying our work center. This storage type needs to have the role set as ‘B’:
A part from this, there is nothing important to mention about the storage type customizing.
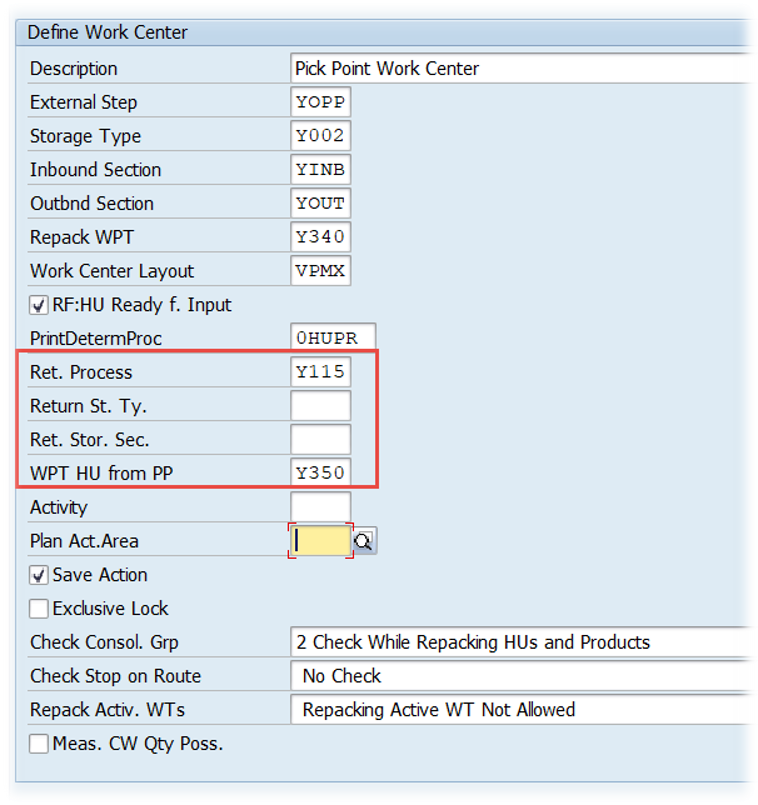
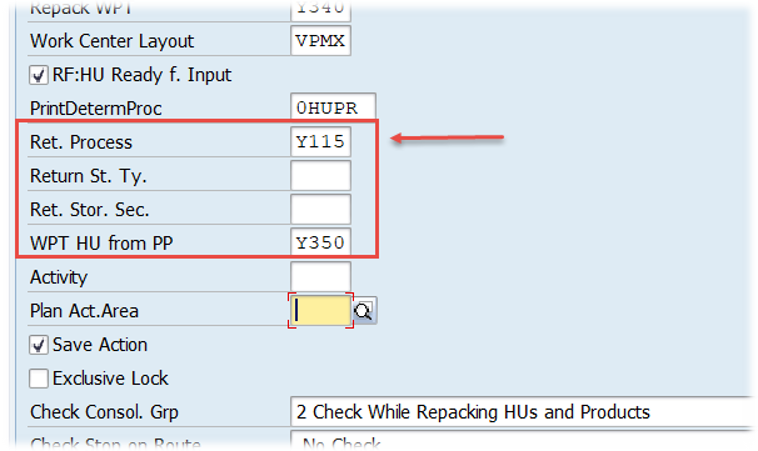
Next thing you need is the work center where the picking process actually happens. You need to link it to the storage type that you created for the pick point. In addition to this you can define the WPT as well as the type & section which should be used for the return process (~ putaway process for the source HU once picking is completed):
Note that it is not mandatory to maintain this data. If the work center does not have a return storage type / section, the system determines the destination storage data using the putaway strategies.
Last but not least (and that’s is really already the last thing that you need to cover in terms of customizing) we need to setup the routing via the layout-oriented storage control. Create one record for your source storage type and the ‘Pick Point’ flag as active. As ‘Intermediate Storage Type’ you set your work center storage type and as WPT provide the one which should be used for the transfer from the source bin to the work center. You can give an intermediate storage bin or let the standard determine a bin based on the putaway strategy of the work center storage type:
You can create separate entries in case you want to separate between complete HU removals and partial removals. E.g. it might make sense to send HUs directly towards packing/staging in case you want to ship the full HU (so only HUs which are subject to partial removal will pass the pick point). To implement this scenario you can make use of the ‘Whole HU’ flag:
As mentioned above, customizing is already done now. Let us have a look at the process.
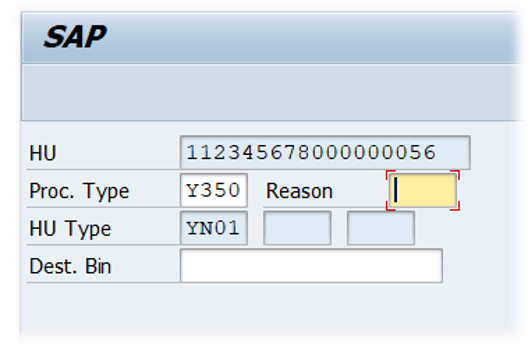
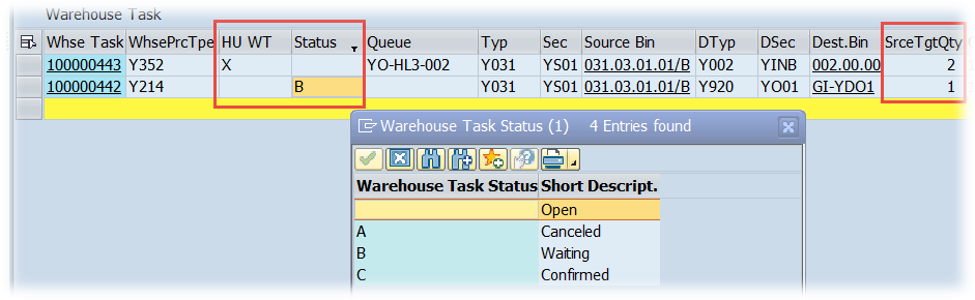
Everything starts with the task creation. In this example we have a partial removal from the source HU. The system will automatically create two warehouse tasks. One HU WT moving the source HU to the pick point and one product WT (in waiting status!) to move the product from the source HU to the destination bin from the warehouse request:
Once the HU warehouse task is confirmed (either manually or via RF or via an automated subsystem) we can start with the picking process. Here we do have two options in EWM standard.
Option 1: /n/SCWM/PACK
Once we have logged in to our pick point work center we have to execute the following steps:
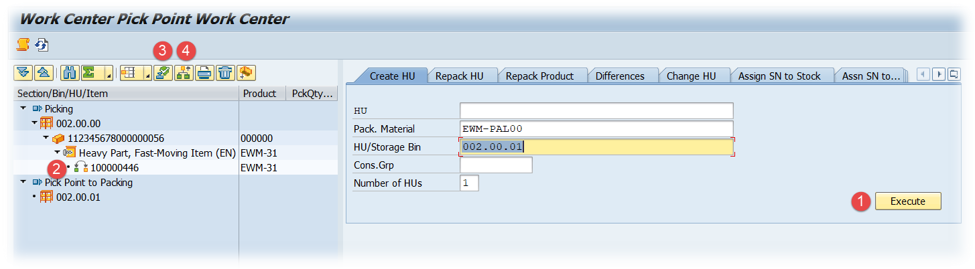
1. Create a pick-HU 2. Drag & Drop the requested quantity via the WT icon to the new HU in order to confirm the repack/pick process 3. Complete the process step for pick-HU 4. Trigger the return task creation for the source HU
The 2nd option is using the RF environment only.
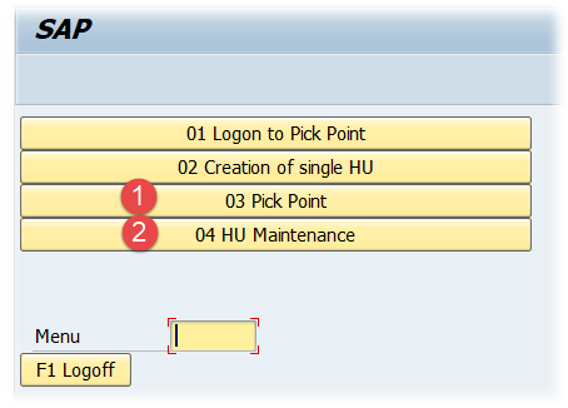
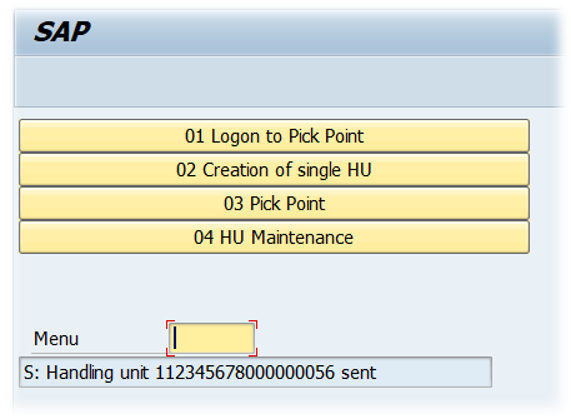
Option 2: /n/SCWM/RFUI
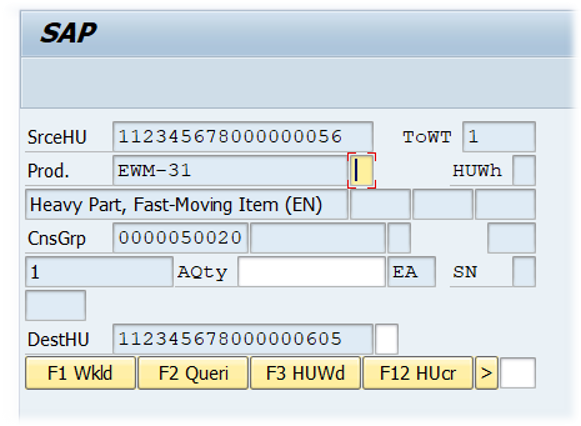
Follow the path shown in the screenshots below:
With the given verification profile, provide the product number and the quantity:
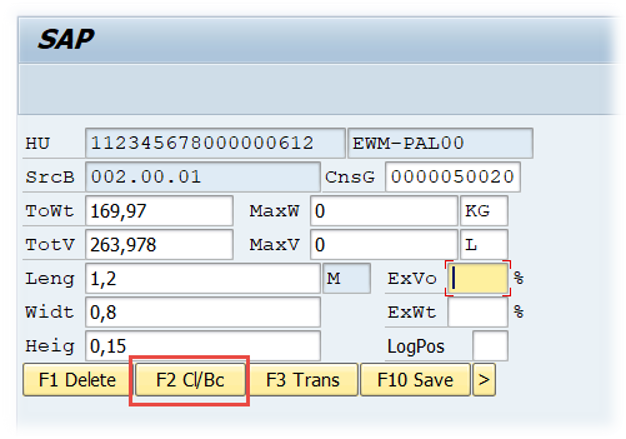
Once done, come back to the menu and open the HU maintenance:
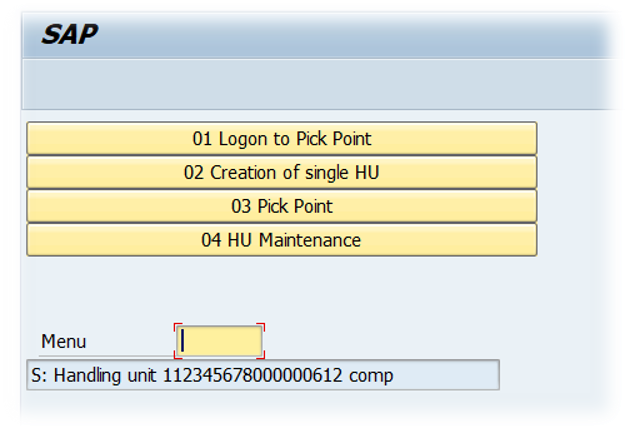
Close the proces step for both, the source HU as well as the pick-HU:
Based on the closure of the process steps, EWM will automatically (assuming that the process-oriented storage control is setup accordingly) create the tasks for the return (source HU) and the next steps (pick HU):
1. The Pick-HU is sent towards the subsequent process step (WPT derived from POSC step) 2. The source HU is sent back to stock with the WPT from the work center customizing
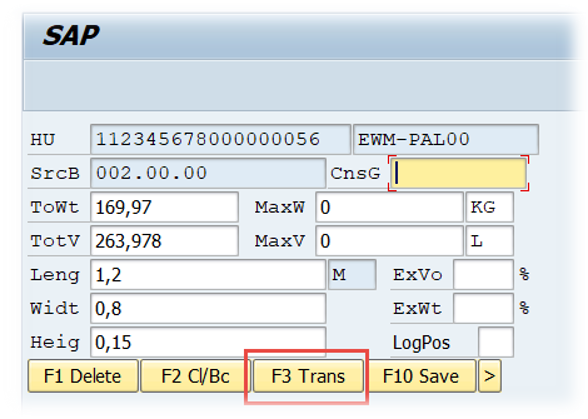
Nice to know: The ‘Transfer’ button can be used to create a WT manually (~ provide the destination bin manually). As with the ‚normal‘ return, WPT will be pulled based on work center customizing:
And that is the whole story. Not more to say. Not very complex stuff and hopefully easy to understand SAP EWM based on this. In our next blog post we will take a look on how to enhance the standard pick point logic. Stay tuned!
I hope this blog post provides value to you and you could learn something. Please feel free to subscribe to my blog updates or my youtube channel in case you want to be notified about new posts!
We use cookies to ensure that we give you the best experience on our website. If you continue to use this site we will assume that you are happy with it.